Saturday, January 14, 2012

Noshahr Canals


Noshahr Canals is a Battlefield 3 map based on the real world location of Noshahr in northern Iran. The map is centered around an industrial harbor, with infantry and vehicle warfare. The map also includes boats and amphibious vehicles, which the attacking forces in Rush use to attack the first objective as their starting point is an aircraft carrier.

Noshahr Canals supports all four Battlefield 3 modes: Rush, Conquest, Team Deathmatch and Squad Deathmatch.

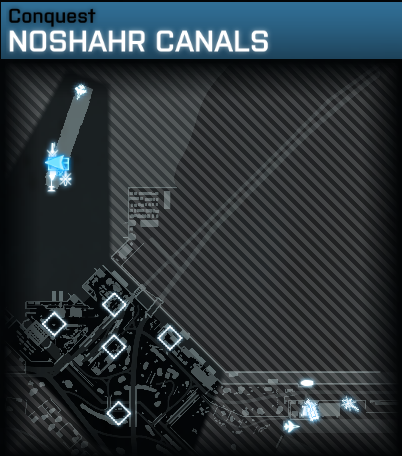
Noshahr Canals layout

The map has five capture points, four of which are easily accessible to either side. The focal point of the map is the center control point, called “Train Yard”, which is hard to defend and often changes control many times during a match, unless it’s defended properly (see under “tips”). There 5 control points in Noshahr Canals are: Train Yard, Dry Dock, Container Area, Storm Drain, Canal.

Noshahr Canals tips

The best tactic is the focus on the three main control points which are very close together and therefore easier to defend: the triangle of “Canal”, “Container Area” and “Train yard”, can, with a good team, be held by staying inside the triangle of those three control points, with fast and easy access to all three flags.

Vehicles

Noshahr Canals is mainly an infantry map, and has a modest amount of vehicles.

US vehicles

Russian vehicles

Seine Crossing


Battlefield 3 Seine Crossing is a map situated in France, and is the second Battlefield 3 map set in Paris, France, the first being Operation Metro. The map is split into two large parts, divided by the river Seine. There are two control points on each side of the river, and a main control point, and the focal point of many tough battles, on a bridge at the est side of the map. Operation Seine in Battlefield 3 will, like all other maps, support all 4 game modes, including Rush and Conquest.

Seine Crossing layout

Seine Crossing is split into two parts by a river. There are two flags on each side, which are easily accessible by both sides, while the main flag that tips the balance is situated on a bridge on the east side of the map, a bridge with very little cover that is hard to re-take once the enemy has it. The control points of Seine Crossing are: Back Streets, Market Avenue, East Bridge, Canal Courtyard, ad Garden Alleyway.

Seine Crossing tips

Seine Crossing has a big focus on defense. If a team can capture the majority of flags (3 out of 5 flags, at least), they are for the most part easy to defend due to plenty of options where defenders can dig in, including many buildings that can be entered and provide an overview of defensive areas. The map is also very well suited for mortar attacks and snipers, which have plenty of places to hide.

Vehicles

Being an infantry-focused map, there are only two vehicles per team in Seine Crossing: one tank and one transport vehicle.

US vehicles

Russian vehicles

Kharg Island

Kharg Island is a brand new Battlefield 3 map set on the real-life version of Kharg Island, situation just off the coast of Iran. The island is an important port of oil transport and oil pipelines. Kharg Island also serves as an important Naval Base for the Iranian Navy. Kharg Island has 5 capture points in Battlefield 3, and is a map that focuses on vehicles, with each team having plenty of vehicles at their disposal.

Kharg Island layout

Kharg Island in Battlefield 3 has 5 capture points, with one capture point that’s relatively close to each team, while the other 3 are up for grabs. The main action usually centers around the middle of the map, between the “Construction Site” and “Offices” flags. The 5 control points/flags in Kharg Island are: Docks, Construction Site, Offices, Army Outpost, and Gas Station.

Kharg Island tips

While Kharg Island is primary a vehicle map, infantry plays a big part as well. Because of much cover on almost all flags, there is plenty of opportunity for ambush and flanking of tanks and other vehicles. The main action usually happens at the Construction site and Offices points, which are the most important, and hardest, flags to capture and defend.

Vehicles

Kharg Island is a vehicle heavy map, and each side have plenty of tanks, jeeps and aerial firepower.

US vehicles

Russian vehicles


Tehran Highway


Battlefield 3 Tehran Highway, is, as the name suggests, based around the Iranian capitol of Tehran, where US and Russian forces in Battlefield 3 battle on a map in the style of Road to Jalalabad and Strike At Karkand. Players start the round in the hills above the city, and gradually work their way in. Tehran Highway is the only nighttime map in Battlefield 3.

Tehran Highway layout

Unlike most other Conquest 64 maps, Tehran Highway has only 4 capture points, which are divided by a highway. This layout usually results in a stalemate with both sides each controlling two flags, with heavy exchange of gunfire and battles across the highway.

Tehran Highway tips

Capturing and holding more than two flags is key to victory, as all other conquest maps. The best way is a head-on assault with vehicles on one of the control points across the highway. Because of its dark setting and plenty of buildings and elevated positions, Tehran Highway is a great place for snipers, who can position themselves above the battle to spot and take out enemies.

Vehicles

Being a mostly urban map, Tehran Highway has a modest amount of vehicles per side. In addition to the starting vehicles, each capture point offers 1 transport vehicle once the flag has been captured.

US vehicles

Russian vehicles

Survey the Terrain

This is a typical urban environment. The highway with the overpass is the dominating feature on this map. To the west is an industrial complex with office trailers and small buildings. The east side is residential with a spattering of garages and dead end alleys. The highway divides the map into two parts and is littered with destroyed vehicles. The highway is crossed with walk bridges and is lower than the sides of the map.

Flag Alpha: Back Yard

This flag is the closest to the Marine spawn at the bottom of the hill on the east side. The flag itself sits in a courtyard in between a three story building, two garages and a smaller road to the east. Whoever captures this flag has a light vehicle spawn here. This flag is out in the open but has a large capture radius, so it can be captured in hiding places to avoid snipers from the west side of the map. Access to the main road is by a set of stairs to the west.

Flag Bravo: Truck

This flag is in the middle of the map on the highway itself. A burning truck, a jack-knifed flat-bed trailer and spilled cargo are the only means of cover next to the flag. As its on the highway, this flag is lower than the sides of the map and it puts defenders in an bad position. This flag is routinely populated with vehicles coming from north and south, while infantry approach from the east and west. This flag produces a light vehicle.

Flag Charlie:Gas Station

This flag is the closest to the Russian spawn. on the west side. The flag capture radius puts attackers directly in harms way as the pumps and fuel tanks can be destroyed. This flag produces a light vehicle for the army that captures it. The flag sits next to the far-west road and is the only way that attacking vehicles can get to the flag. The infantry can assault the area by using the eastern steps when coming from Bravo. This flag gives access to both walk bridges within walking distance.

Take Inventory

The Marines deploy with a LAV-25 and an M1 Abrams MBT.
The Russians deploy with a BMP-2M and a T-90 MBT.
*Although I don't dictate what equipment each soldier takes to the battlefield, this is an exception. It would be wise for each squad and tankers to have access to Infrared Scopes and sights. The map is dark and potential ambushers have an advantage here. Equiping these scopes takes away that advantage

Strategize

Heed the words of Sun Tzu: Do not climb heights in order to fight. Just like Grand Bazaar, objective Bravo is in the middle of the map. Just like Grand Bazaar, its in a very undesirable position and holds no strategic value. Only a light vehicle spawns here and it sits in essentially a kill zone. An experienced player will tell you that attacking high ground is very foolish and leads to lots of death. So why subject yourself to that?

Once deployed, let the ground forces move forward and take the closest objective (Alpha or Charlie). Once that flag is secured, set up a defensive perimeter and face Bravo. The vehicles should back up the ground forces at Alpha/Charlie until you see Bravo being captured.

Once Bravo is captured, the ground forces should feint an attack on Bravo from the high ground, using available cover to shoot down. There's a high probability that the enemy will bring their vehicles to Bravo to defend against the attack. Don't worry, you hold the high ground and tanks are big targets. Not all of the ground forces should be in the front, some need to defend the road behind the flag in case of a flanking attack.

During the feint attack, the vehicles should move along the map-edge roads and capture the other sides spawn flag. More than likely, it will be poorly defended as the team will bring up any defenders to fight for Bravo. Once that flag is taken, the vehicle force should engage Bravo from their rear. Bravo is now surrounded on both sides in the lowest part of the map; a meat grinder.

Against a team of uncoordinated randoms, 85% of the time they will defend Bravo to the death, foolishly. Against an organized team, they may very well just spawn in their deployment zone, which still works in your favor since your vehicles are already in a forward position. Bring up Engineers and pin them in their spawn and watch the tickets bleed.

You can capture Bravo to speed up ticket bleed, but don't put up a valiant defense for it ; just enough for the enemy to think you are trying to hold it. Once enemy vehicles are brought up, abandon it and seek the high ground. If one of the high-ground flags falls, regroup and do it all over again. This time they may be prepared for it, so try a different way. Just keep in mind that the primary objectives are the perimeter flags, not the center. The only advantage that Bravo has is the overpass prevent mortars from hitting defenders.

Tips for this map

As said before, use IR sights. The dark plays tricks with your eyes.

Set up SOFLAMS so they look down the highway. This will spot enemies and vehicles that enter the highway, as well as laser-designate the tanks. Good places are on the grass along the highway to the north (Marines) or on the southernmost walkway over the highway (Russian)

Mine the east and west roads to protect against a blitzing fast vehicle. Mines are now easily spotted but on this map, the dark works in your favor.

Snipers in the Marine base can see right into the Bravo area. Russian snipers on the walkway near their spawn can see the same area.

Engineers and support soldiers with Bi-pods along the high perimeter overlooking the road can defend Bravo effectively if holding that flag is somehow needed (eg, end of match and need to bleed a few tickets more to win).

A good place to plant C4 is on the sparse cover around Bravo. The enemy WILL run to these places during an attack.

Damavand Peak


Damavand Peak is a Battlefield 3 map based on the real world mountain of Damavand in Iran. The Battlefield 3 map versions of Damavand Peak are based around a large tunnel that divides the map in two and serves as the focal point of the map. The map will also feature based jumping on the Rush game mode, where attackers base jump into the first area of attack. Damavand Peak has the biggest height difference of any map in Battlefield 3, at 500 meters.

Damavand Peak layout

Damavand Peak is based on a central tunnel system that runs under the mountain. In Conquest, there are five capture points, two on each side and one critical capture point in the middle of the tunnel. Each team has a helicopter at their disposal, which can be used to fly over the mountain and attempt to flank the opposing team.

Damavand peak tips

The most important objective/control point in Damavand Peak is the center “Tunnel” control point, which is very hard to take once the opposing team has established their defenses. Therefore, you should always use the vehicles available and go straight for the Tunnel capture point at the beginning of the map. Alternately, if the opposing team has the Tunnel, you should use the chopper and try and flank and capture the points on the opposite side of the mountain.

Grand Bazaar


Battlefield 3 Grand Bazaar map is set in Tehran, and is a relatively small map that’s focused heavily on infantry combat. Grand Bazaar is light on vehicles and has a dense, urban location with a lot of alleys and streets, perfect for flanking towards the objectives, whether they are capture points or M-COM stations.

Grand Bazaar layout

Grand Bazaar is set in a tight, urban environment, where fast movement and good infantry skills are key. The map retains its urban and dense setting regardless of what mode is played, whether its Conquest or Rush, Team Deathmatch or Squad Deathmatch.

There are 5 capture points in Grand Bazaar, 4 of them are centered around the main flag called “Alley”, which is the focal point of many tense battles.

Grand Bazaar is an urban environment supplemented with vehicles. THe map is largely based on one city block and the building fronts along the perimeter streets. The teams spawn on opposite corners of the map. Each spawn has one flag closest to their spawn (flags "A" and "C") and a central one within an alleyway (Flag "B"). Both teams start with one light vehicle and an IFV.

A strategy planning session has multiple different ways of devising a plan, but there is always a few things everyone should do before that happens:

1) Survey the Terrain.
Before you charge forward like an idiot, take a look at the battleground first. Find the advantages, then the disadvantages. In Grand Bazaar, its an urban environment full of ambush possibilities. The streets are open for vehicles, but vehicle support is minimal at best in the interior. This map is best fought with the majority of infantry able to function by themselves.

2) Take inventory.
That means, what assets does your team have and what vehicles are available? On this map, both teams have fast vehicles and IFV's. Fast vehicles are great for rapid transport for troops, scouting and providing fire support in the way of mounted MG's. IFV's can also transport troops more safely, but at a loss for speed. Their shining asset is the heavy guns and are more adept at providing fire support for the team. Personal equipment is fielders choice.

3) Strategize.
Using the layout and equipment available, as well as the number of troops, devise a plan to maximize your advantages and minimize the disadvantages.


Final Strategy

Grand Bazaar has 3 flags and bleeding starts with just 2 flags taken. The Alpha and Charlie flags are near each spawn point and are easily taken by both teams. The real pain is Bravo since it is in a small alley with a limited axis of approach. Whichever team controls this flag can easily defend it with one soldier prone on the ground firing down the alley. SInce it is in the middle of the map, novice players naturally think that objective is vital. It is not and here a few reasons why:

1) Its position isn't strategically vital. It spawns no vehicles, watches over nothing except the alley itself and has so many entrances into it that to properly defend against flanking forces means stretching the teams lines really thin to prevent enemy penetration.

2) Vehicles can't support the soldiers in the middle at all except down the alley. Smart opponents will attack from the flanks, effectively neutralizing the vehicles and its occupants. It would be unwise to foolishly think that your opponents are dumb enough to charge down the alley. Military Maxim: Never underestimate your opponent.

3) To capture this Flag means getting bloody and losing LOTS of tickets, valuable tickets. Those tickets are better spent attacking and defending the spawn area flags, not hopelessly attacking a meaningless objective.

So what do you do? The following is an overall team strategy and needs to be coordinated as such. Inform the team of the plan and hope they swallow their ego enough to follow it.

Before spawning, divide the team into two separate forces: one ground force and one vehicle force.Once the game starts, the ground forces objective is to grab and hold the spawn area's flag. Spread the soldiers out to cover the alley entrance, the street, and the side entrances, but close enough to support one another in case the situation goes sideways. Once the flag has been taken, set up a defensive perimeter and hold that objective to the last man.

The vehicle force has a different objective. Split this force into two elements: one in the fast vehicle and one in the IFV. The fast vehicle is the scouting force and should drive cautiously around the perimeter, keeping an eye out for flanking enemy soldiers. The IFV should travel behind the scout back far enough to not be seen first, but close enough to assist the light armored vehicle in case of trouble. The main objective is the enemies spawn flag. Timing is everything, so the vehicles should wait for the enemy to capture the Bravo flag first before attempting to capture the enemy spawn flag.

Once the enemy has captured Bravo, execute the attack. The ground force should feint an attack on the Bravo flag in mass. This will trick the enemy into thinking you team is going for capture, and will bring up reinforcements, emptying thier spawn flag. At the same time the vehicles, who should have been staged just around the corner from the enemy spawn flag out of sight, should move forward and capture the flag in mass as well.

With both flags captured, the enemy trapped in the alleyway defending a worthless Bravo flag and your teams vehicles parked in their spawn flag, the enemy has been effectively split in two. With the vehicles just around the corner from the enemy vehicles spawn, they should be easy prey when they come around the corner. Do not engage the enemy in the urban interior: that is their tactical advantage now and never fight on the enemies terms. Once both flags are held, the operation goes from offensive to defensive so hold the line. Leave Bravo alone and quarantine that flag.

The main goal is to capture the perimeter flags and ignore the Bravo flag. Let the enemy bleed the tickets defending a worthless objective. You will lose the flags over the course of the round, but the priority is Alpha and Charlie. Keep the vehicles alive and your team will collect a win sooner or later.

Operation Firestorm


Operation Firestorm is a large desert map with an oil refinery in the middle. There are 5 objectives, and teams typically start with 300 points.

It is best with 64 players.

Each side spawns with:

  • 1 Attack Helicopter
  • 1 Transport Helicopter
  • 2 Attack jets
  • 2 Tanks
  • 1 Mobile Anti-Air
  • 2 Jeeps

Location C is near a large tower with metal scaffolding that players can climb around on, watch this are for Snipers.
Location E will typically be the first target for RU tanks.
Location D has multiple wire frame buildings. Dangerous for tanks as there is a lot of cover for ATs to hide. Usually the first target for US tanks.
Location A is warehouses.
Location B is warehouses.

As US

Give the transport helicopter to one squad, their goal is to rush C. Make sure you have some AT personal as there will often be a tank cutting over from E. If the Helicopter is still alive when the C squad is dropped head back and grab the players who didn’t get a vehicle. The attack helicopter should be defending the transport chopper.

The jets should focus on prevent their transport chopper from doing the same, then focus on damaging the tanks hitting E and C.

The jeeps should rush B, let the tanks and the second trip from the transport chopper get D and A.

The end goal is to lock down A, B, and D. ‘

Watch for snipers in between the RU spawn and C in the foothills. Also on top of the warehouses and in the oil refinery scaffolding.

Station your anti air in the hills behind D.

As RU

Transport helicopter should rush A with a forward squad, make sure you have AT. Have the attack helicopter defend the transport.

Jets should be hitting the enemy helicopters and the tanks attacking D and A.

The end goal is to lock down E, C, B.

Station your anti air in the foothills behind C.

Watch the mountains for snipers, they love it up there. slowly push at A, the goal isn’t to take it but rather to distract them from swinging behind and taking E.